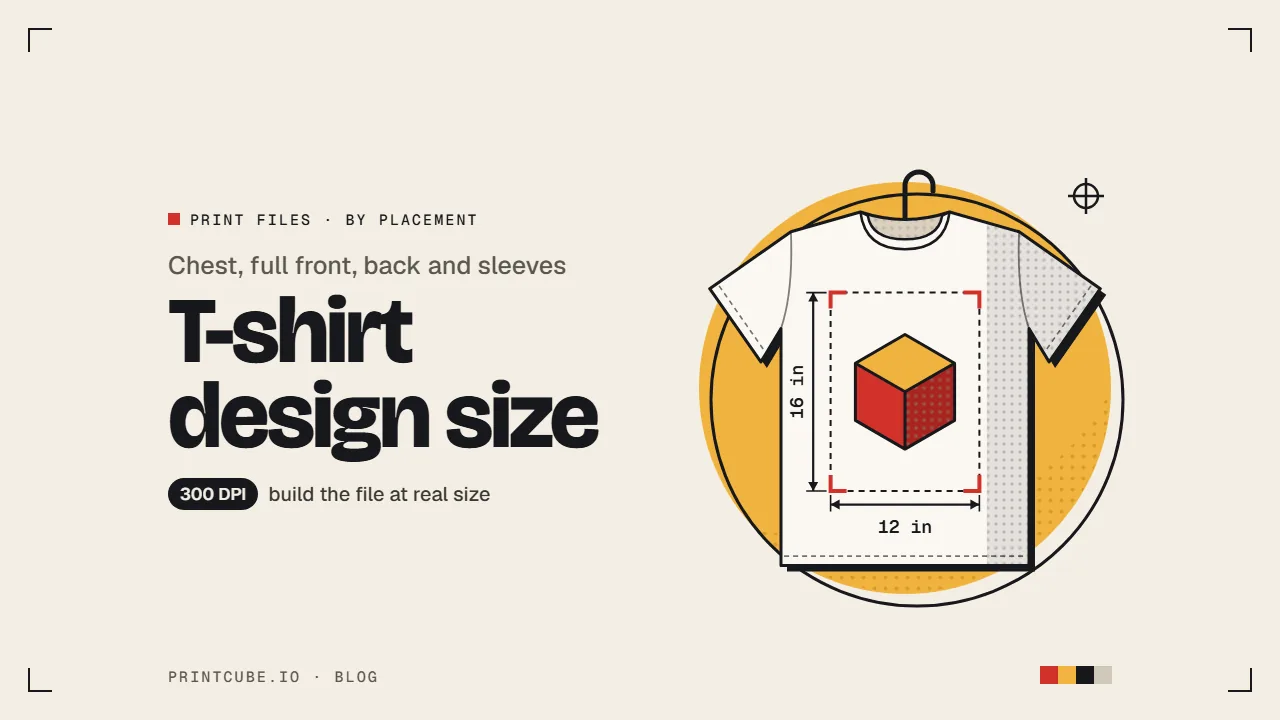

Build a standard full front t-shirt design at 12 × 16 inches and 300 DPI, which is 3600 × 4800 pixels. Save it as a PNG with a transparent background. That one setting suits most print-on-demand shirts. Smaller placements like a left chest logo need smaller files, and your product's own template on Printful or Printify always has the final say.
The File Size to Start With
If you're opening Canva, Procreate or Photoshop right now, create a new document at 3600 × 4800 pixels (12 × 16 inches at 300 DPI). Design your artwork on it, then export a PNG with a transparent background so only the artwork prints and not a rectangle around it.
DPI means dots per inch. For a digital file, it's how many pixels sit in each inch of the printed design. More pixels per inch give the printer more detail to work with, so edges stay crisp instead of blocky.
Treat 12 × 16 as a starting point and not a rule. Print areas change from blank to blank, between print providers, and sometimes between sizes of the same shirt. When the product template in your platform shows a different number, follow the template.
How Inches, DPI and Pixels Fit Together
The math is a single multiplication:
inches × DPI = pixels
Say you want a 4-inch square logo on the left chest. At 300 DPI, that's 4 × 300 = 1200 pixels on each side, so your file should be 1200 × 1200 pixels. At 150 DPI, the same logo needs 600 × 600 pixels.
150 DPI vs. 300 DPI
Fabric is a soft, textured surface, so it can't hold the fine detail that glossy paper can. That's why 150 DPI is acceptable for apparel. Printful asks for at least 150 DPI on its DTG shirts (300 for its DTFlex prints), and Printify recommends 300.
Most sellers aim for 300 DPI to leave some margin. Going above 300 makes the file heavier without making the print any sharper.
Why You Can't Add Detail Afterward
A small image stays small no matter what number you type into the DPI box. If you change a 600-pixel image from 72 to 300 DPI without adding pixels, it only prints smaller. If you stretch it to 1200 pixels, the software has to invent the missing pixels by guessing, and the shirt shows the guesswork as soft or jagged edges.
The only fix is to start with enough pixels: build the design at full size from the beginning, or redraw it as vector art. Vector art is made of shapes rather than pixels, so it can be exported at any size.
What T-Shirt Design Size to Use for Each Placement
The figures below follow Printful's standard placements, which line up with most providers. Pixel counts are inches multiplied by DPI.
| Placement | Typical size (inches) | Pixels at 150 DPI | Pixels at 300 DPI |
|---|---|---|---|
| Left chest | 2.5 × 2.5 to 5 × 5 | 375 to 750 square | 750 to 1500 square |
| Center chest | 6 × 6 to 10 × 8 (8 × 8 is common) | 1200 × 1200 (at 8 × 8) | 2400 × 2400 (at 8 × 8) |
| Full front, standard | 12 × 16 | 1800 × 2400 | 3600 × 4800 |
| Full front, larger DTG area (select Printful shirts) | 15 × 18 | 2250 × 2700 | 4500 × 5400 |
| Back (DTG) | up to 10 × 12 to 12 × 16, by product | 1800 × 2400 (at 12 × 16) | 3600 × 4800 (at 12 × 16) |
| Short sleeve | up to about 4 × 3.5 | 600 × 525 | 1200 × 1050 |
| Inside label | up to about 3 × 3 | 450 × 450 | 900 × 900 |
Other providers offer full front areas a little smaller or larger than 12 × 16, and back areas vary more than any other spot. Treat those two rows as typical, not fixed.
Print Area vs. Design Size
The print area is the largest space the printer can cover on that spot. The design size is how much of it your artwork uses. They don't have to match.
A wide text design might be 12 inches across but only 5 inches tall. A simple badge might look best at 9 inches wide on a 12-inch area. Filling the whole print area isn't required, and a design that fills it often looks heavier on the shirt than people expect. Size the artwork for how it should look when worn, then place it inside the print area.
Where Each Design Goes on the Shirt
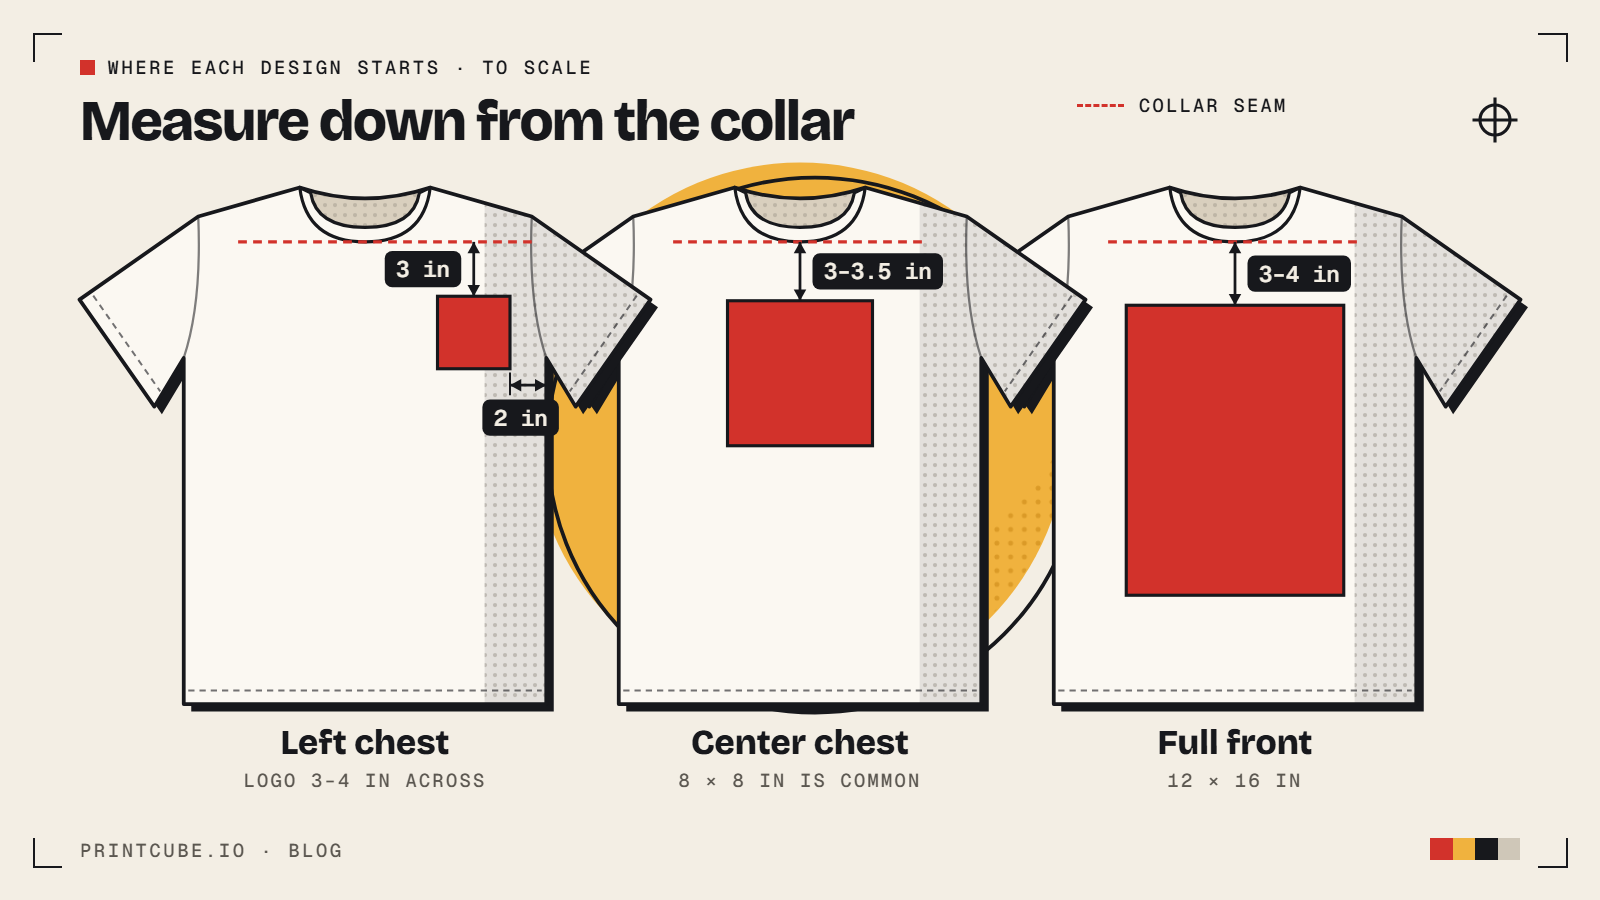
These distances and sizes come from Printful's t-shirt design placement guide and match how most retail tees are printed.
Left Chest
Place the design about 3 inches below the neckline and about 2 inches in from the armpit seam, centered over the wearer's left chest. On a flat mockup facing you, that's the right side of the image.
Pocket-Style Logo
Most print-on-demand tees don't have a real pocket, so a "pocket" design is a small left chest design in the same spot. A size of 3 to 4 inches across works well. A logo that size makes a clean, understated brand mark.
Center Chest
The top of the design sits 3 to 3.5 inches below the collar. This works for mid-sized graphics that should be noticed without covering the whole front.
Full Front
The top of the artwork should start 3 to 4 inches below the collar. When a large print ends up near the belly, the cause is nearly always the file and not the printer. If your canvas is 12 × 16 but the artwork only fills the bottom 10 inches, the platform places the whole canvas, empty top included, and the visible design sits low.
Back
Back designs go on the upper back and start a few inches below the collar, like a full front.
Sleeves
Sleeve prints are small, usually up to about 4 × 3.5 inches on a short sleeve. They're centered on the outside of the sleeve and work best with simple marks or short words.
Measure Your Own Tee
Lay a t-shirt you like flat on a table. Measure 3 inches down from the collar seam and mark the spot with a sticky note. That's where a center or full front design starts. Then hold a printout of your design against the shirt. A few minutes here tells you more than any mockup about whether the size feels right.
Does Your Design Change Size From Small to 3XL?
It depends on the platform and the product. This is where many sellers get surprised.
Printful
In general, Printful prints your design at the same dimensions on every shirt size. A 10-inch-wide design is 10 inches wide on a small and on a 5XL.
The exception is the larger 15 × 18 inch front area, which replaced the older 12 × 16 front on these shirts:
- Bella + Canvas 3001, sizes L to 5XL
- Bella + Canvas 3413, sizes L to 4XL
- Cotton Heritage MC1082, sizes M to 3XL
The smaller sizes of those shirts use a reduced 11.5 × 13.8 inch area, and your design shrinks in proportion to fit. Some other DTG and DTFlex products scale too. The product's page in Printful shows which behavior applies.
Printify
On Printify, the recommended file size can change by product and by garment size. On DTG and most DTF products, designs shrink automatically on smaller sizes so they fit the smaller print area.
One Design Across S to 3XL
Imagine you upload a 12-inch-wide design on a Printful shirt that prints at the same size on every size, and you sell S to 3XL.
A small tee measures roughly 18 inches across the chest laid flat. Your 12-inch design covers about two-thirds of that width and looks bold, close to the side seams.
A 3XL measures about 28 inches across. The same 12 inches covers less than half the width and can look modest on a larger body.
Neither result is wrong, but you should know which one your customer will get. Before you publish, open the mockups for your smallest and largest sizes and check both.
Setting Up the File: Format, Color Profile and Upload Limits
Use a Transparent PNG
PNG files can have a transparent background. JPG files can't, so any background color, white included, prints as a visible box. On a white shirt you might not notice it at first, but on any other color it's obvious, and DTG printers may also lay white ink under the "empty" area. Export as PNG and confirm that the background shows as a checkerboard or as transparent in your app.
Work in sRGB, Not CMYK
A color profile tells the printer how to interpret the colors in your file. Print-on-demand printers expect sRGB, the standard color space for screens. Printful specifies sRGB IEC61966-2.1. If you upload in CMYK, the color mode used in offset printing, Printify converts it, and colors can come out duller or shifted. Set sRGB when you create the document so you see the right colors as you design.
Upload Limits
- Printful: up to 200 MB per file, and up to 20,000 × 20,000 pixels
- Printify: up to 100 MB for JPG and PNG, and 20 MB for SVG
A 3600 × 4800 PNG is usually well under these limits. Large files with heavy texture or gradients are the ones that occasionally run into the caps.
Build at Real Size, Then Trim
Create your canvas at the actual print size and resolution from the start, using the table above. When the artwork is done, crop the canvas tight to the artwork so no transparent margin is left around it. The platform then sees the true edges of your design, and you control where it sits.
Printful's guide to preparing a printfile walks through these settings in more detail if you want screenshots.
How DTG, Embroidery and All-Over Print Change the Limits
DTG
DTG, or direct to garment, prints ink straight onto the fabric, like an inkjet printer for shirts. It gets the largest print areas, including every size in the placement table, and handles photos, gradients and fine detail well.
Embroidery
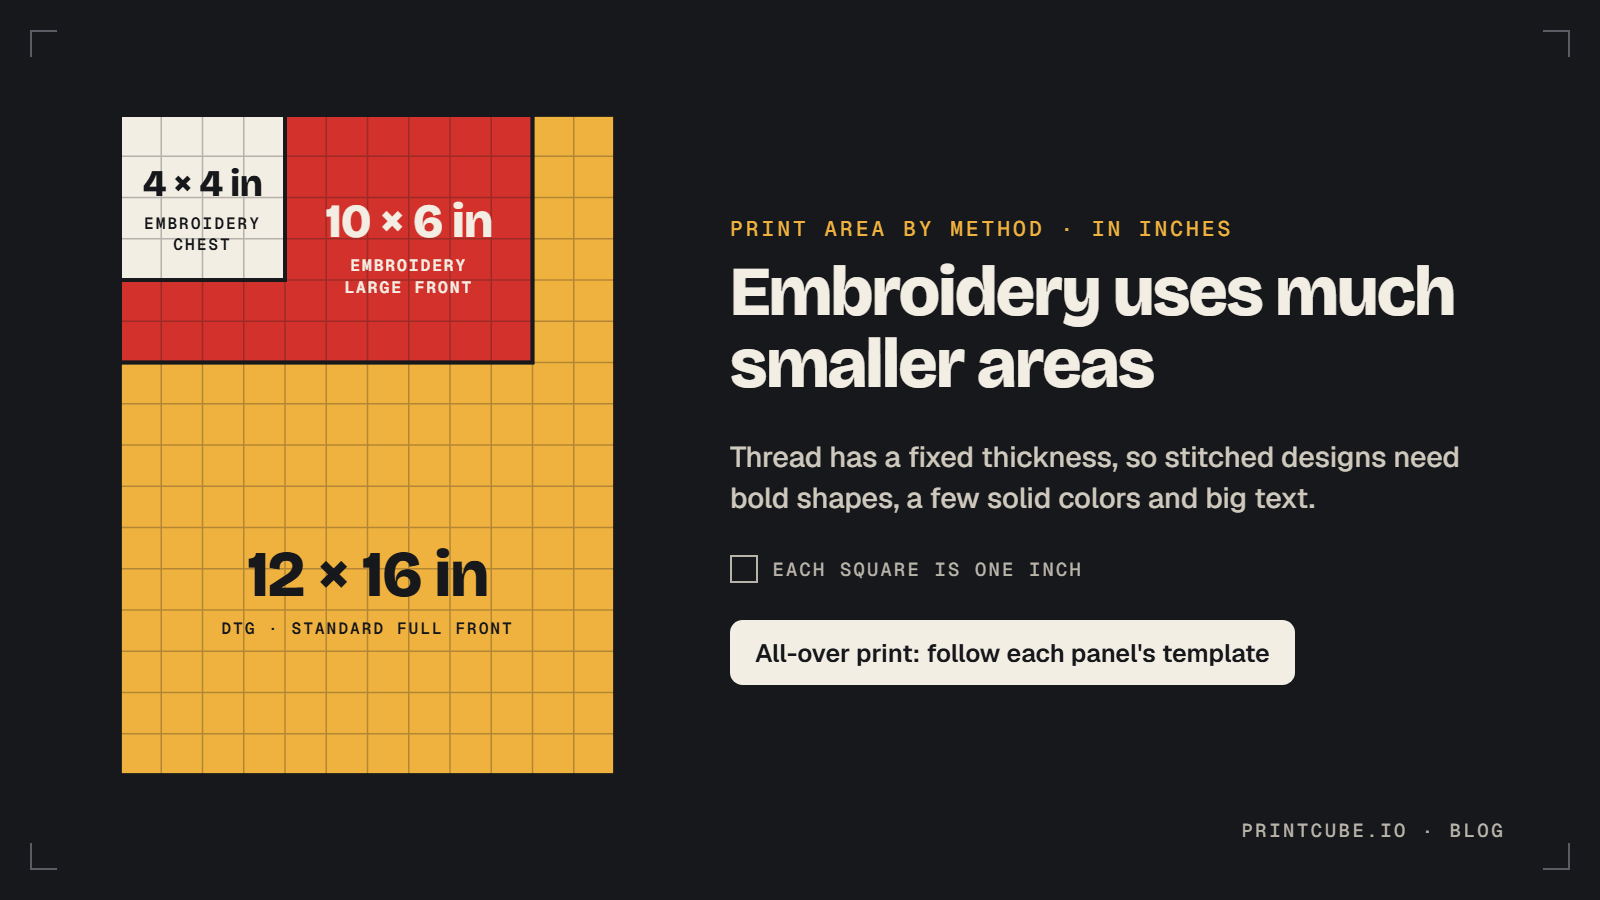
Embroidery stitches your design with thread, so it uses much smaller areas. On Printful, left chest and center chest embroidery is capped at 4 × 4 inches, and large front embroidery at 10 × 6 inches.
Thread has a fixed thickness, so fine details don't hold up. Small text blurs into a lump, thin lines disappear or pucker, and soft gradients can't be stitched. Designs with bold shapes, a few solid colors and text big enough to read from across a room give the best embroidery results.
All-Over Print
All-over print shirts are printed as flat fabric panels and sewn afterward. They don't use chest or back placements. You get a full-panel template for each piece of the shirt instead, so follow that template.
Finding Your Product's Real Template in Printful or Printify
General charts give you a solid starting point. Your exact blank and print provider decide the real limits.
In Printful, open the product in the catalog and look for the file guidelines section. It lists the print area for each placement in inches and pixels, and the downloadable templates show the printable area on the garment. If the product uses the larger 15 × 18 area, its size range is shown there too.
In Printify, open the Product Creator for the product and print provider you've chosen. The Upload section shows the recommended pixel size for each print area, and that number can change when you switch providers. Printify's t-shirt design size guide explains the general ranges, but the Product Creator reflects your specific blank.
A generic chart can't know that one provider's full front is an inch narrower, or that your chosen shirt scales on smaller sizes. The template does, so check it before you set the final canvas size.
Common Mistakes and How to Fix Each One
Upscaling a Small Image
Problem: A small image stretched to full size prints blurry or pixelated. Fix: Recreate the design at full size, or vectorize it and export at the size you need.
Empty Space at the Top of the Canvas
Problem: The print sits low on the shirt. Fix: Crop the canvas to the edges of the artwork before uploading, then position it in the platform's editor.
A Box Around the Design
Problem: A white or colored rectangle prints behind the artwork. Fix: Export as a PNG with a transparent background, not a JPG.
Dull or Shifted Colors
Problem: Colors look flat compared to your screen. Fix: Design and export in sRGB instead of CMYK.
Trusting a Generic Chart
Problem: The file doesn't match the product's real print area, so it gets scaled or cropped. Fix: Use the product's template or the recommended pixel size from the platform.
Skipping Size Mockups
Problem: The design looks fine on a medium but too big or too small at the ends of your size range. Fix: Preview the smallest and largest sizes you sell before publishing.
Over-Detailed Embroidery
Problem: Small text and thin lines stitch poorly. Fix: Simplify the design, enlarge the text, and reduce the number of colors for embroidery versions.
FAQ
Can I use 150 DPI instead of 300?
Yes. 150 DPI is acceptable for apparel and prints well for most designs. 300 DPI gives you a little extra sharpness and flexibility, which is why it's the common recommendation.
How far below the collar should a full front design start?
The top of the artwork should start 3 to 4 inches below the collar seam. Crop away empty space at the top of your file so the platform positions the visible artwork there.
Should my file be the full 12 × 16 inches even if my design is smaller?
No. Make the file the size of the artwork itself, at 300 DPI. A 10 × 6 inch text design should be a 3000 × 1800 pixel file, then placed inside the 12 × 16 print area.
What size should a pocket logo be?
Treat it as a small left chest design, usually 3 to 4 inches across. At 300 DPI, a 4-inch logo needs 1200 × 1200 pixels, placed about 3 inches below the neckline and 2 inches in from the armpit seam.